Cucumber

Q: Explain data table implementation in Cucumber ?

Ans:

Data Tables in Cucumber

In this example, we will pass the test data using the data table and handle it using Raw() method.
Scenario: Successful Login with Valid Credentials
Given User is on Home Page
When User Navigate to LogIn Page
And User enters Credentials to LogIn
        | testuser_1 | Test@153 |
Then Message displayed Login Successfully


The implementation of the above step will belike this:
@When("^User enters Credentials to LogIn$")
public void user_enters_testuser__and_Test(DataTable usercredentials) throws Throwable 
{
//Write the code to handle Data Table
List<List<String>> data = usercredentials.raw();
//This is to get the first data of the set (First Row + First Column)
driver.findElement(By.id("log")).sendKeys(data.get(0).get(0)); 
//This is to get the first data of the set (First Row + Second Column)
        driver.findElement(By.id("pwd")).sendKeys(data.get(0).get(1));
        driver.findElement(By.id("login")).click();
}


@RunWith(Cucumber.class)
@CucumberOptions(
features = "Feature"
,glue={"stepDefinition"}
)
public class TestRunner {
}


Feature File
Feature: Login Action
Scenario: Successful Login with Valid Credentials
Given User is on Home Page
When User Navigate to LogIn Page
And User enters Credentials to LogIn
        | testuser_1 | Test@153 |
Then Message displayed Login Successfully


Step Definition
public class Test_Steps {
public static WebDriver driver;

@When("^User enters Credentials to LogIn$")

         public void user_enters_testuser__and_Test(DataTable usercredentials) throws Throwable {

    List<List<String>> data = usercredentials.raw();
    driver.findElement(By.id("log")).sendKeys(data.get(0).get(0)); 
    driver.findElement(By.id("pwd")).sendKeys(data.get(0).get(1));
    driver.findElement(By.id("login")).click();
}
}

 ===================== Maps in Data Tables ======================

Maps in Data Tables can be used if different ways. Headers can also be defined for the data tables. A same step can be executed multiple times with different set of test data using Maps.

a .Maps in Data Tables with Header

In the previous chapter of Data Tables in Cucumber,  we pass Username & Password without Header, due to which the test was not much readable. What if there will 
be many columns. The basic funda of BDD test is to make the Test in Business readable format, so that business users can understand it easily. Setting Header in Test data 
is not a difficult task in Cucumber. take a look at a below Scenario.


Feature File Scenario
Scenario: Successful Login with Valid Credentials
Given User is on Home Page
When User Navigate to LogIn Page
And User enters Credentials to LogIn
| Username   | Password |
        | testuser_1 | Test@153 |

Then Message displayed Login Successfully


The implementation of the above step will be like this:
       

       @When("^User enters Credentials to LogIn$")
public void user_enters_testuser_and_Test(DataTable usercredentials) throws Throwable {
//Write the code to handle Data Table
List<Map<String,String>> data = usercredentials.asMaps(String.class,String.class);
    driver.findElement(By.id("log")).sendKeys(data.get(0).get("Username")); 
    driver.findElement(By.id("pwd")).sendKeys(data.get(0).get("Password"));
    driver.findElement(By.id("login")).click();
           }
   
b .Maps in Data Tables with Multiple Test Data

In this test we will pass Username and Password two times to the test step. So our test should enter Username & Password once, click on LogIn button and repeat the same steps again.

        Scenario: Successful Login with Valid Credentials
Given User is on Home Page
When User Navigate to LogIn Page
And User enters Credentials to LogIn
| Username   | Password |
        | testuser_1 | Test@153 |
        | testuser_2 | Test@154 |
Then Message displayed Login Successfully

The implementation of the above step will be like this:
@When("^User enters Credentials to LogIn$")
public void user_enters_testuser_and_Test(DataTable usercredentials) throws Throwable {
//Write the code to handle Data Table
for (Map<String, String> data : usercredentials.asMaps(String.class, String.class)) {
    driver.findElement(By.id("log")).sendKeys(data.get("Username")); 
    driver.findElement(By.id("pwd")).sendKeys(data.get("Password"));
    driver.findElement(By.id("login")).click();
}
}


c .Map Data Tables to Class Objects

Luckily there are easier ways to access your data than DataTable. For instance you can create a Class-Object and have Cucumber map the data in a table to a list of these.

        Scenario: Successful Login with Valid Credentials
Given User is on Home Page
When User Navigate to LogIn Page
And User enters Credentials to LogIn
| Username   | Password |
        | testuser_1 | Test@153 |
        | testuser_2 | Test@154 |

Then Message displayed Login Successfully


The implementation of the above step will be like this:
@When("^User enters Credentials to LogIn$")
public void user_enters_testuser_and_Test(List<Credentials>  usercredentials) throws Throwable {
//Write the code to handle Data Table
for (Credentials credentials : usercredentials) {
    driver.findElement(By.id("log")).sendKeys(credentials.getUsername()); 
    driver.findElement(By.id("pwd")).sendKeys(credentials.getPassword());
    driver.findElement(By.id("login")).click();
}
}

Class Credentials

public class Credentials {
private String username;
private String password;


public String getUsername() {
        return username;
    }
public String getPassword() {
        return password;
    }
}

Q: How to rerun only failed test cases using TestNG in automation testing framework? TestNG listeners for Automation Framework

Ans:

1. Create a class which implements IRetryAnalyzer and provide the retry count @maxRetryCount

public class FailRetry implements IRetryAnalyzer

 {

  private int retryCount = 0;

  private static final int maxRetryCount = 2;

       @Override

      public boolean retry(ITestResult result)

     {

            if (retryCount < maxRetryCount) 

        {

              retryCount++;

              return true;

        }

        return false;

      }

  }


2. Create a class which implements IAnnotationTransformer and pass the class name that we have created in step-1  @setRetryAnalyzer

public class RetryListener implements IAnnotationTransformer 

{

    @Override

    public void transform(ITestAnnotation testannotation, Class testClass,Constructor testConstructor, Method testMethod)    

        {

            IRetryAnalyzer retry = testannotation.getRetryAnalyzer();

            if (retry == null)    

            {

            testannotation.setRetryAnalyzer(FailRetry.class);//pass the class name created in Step-1

            }


        }

}


3. Add listener in testng.xml file after the suite tag as below and define the class name created in Step-2 with the package path

  <suite name="Automation Test Suite">

    <listeners>

        <listener class-name="com.task.automation.util.RetryListener"/>

    </listeners>


In Cucumber, we can re-run failed test cases using different approaches. Here are a few possible ways:

  1. Using Rerun plugin: The Rerun plugin is a built-in plugin that allows us to re-run failed test cases automatically. We need to specify the plugin in the Cucumber options and provide a file path to store the failed test cases. Here is an example:
kotlin
@CucumberOptions( plugin = {"rerun:target/rerun.txt"}, features = "src/test/resources/features", glue = "com.example.steps" )

After running the tests, the Rerun plugin creates a text file in the specified path that contains the failed test cases. We can then re-run the failed tests using the command:

bash
mvn test -Dcucumber.options="@target/rerun.txt"
  1. Using Cucumber hooks: We can also use Cucumber hooks to retry failed test cases. We can create an After hook that checks if the scenario failed and reruns it based on a specified condition. Here is an example:
less
@After public void afterScenario(Scenario scenario) { if (scenario.isFailed()) { // Retry logic here } }

We can then implement the retry logic inside the if condition to rerun the failed scenario.

  1. Using TestNG retry analyzer: If we are using TestNG with Cucumber, we can use the TestNG retry analyzer to rerun failed test cases automatically. We need to create a retry analyzer class that implements the IRetryAnalyzer interface and provide the maximum number of retries. Here is an example:
java
see the first answer

We can then annotate the test method or scenario with the TestNG @RetryAnalyzer annotation to apply the retry analyzer. TestNG will automatically rerun the failed tests based on the provided logic.


Q:How to implement listener in selenium

ITestListener has following methods

  • OnStart-> OnStart method is called when any Test starts.
  • onTestSuccess-> onTestSuccess method is called on the success of any Test.
  • onTestFailure-> onTestFailure method is called on the failure of any Test.
  • onTestSkipped-> onTestSkipped method is called on skipped of any Test.
  • onTestFailedButWithinSuccessPercentage-> method is called each time Test fails but is within success percentage.
  • onFinish-> onFinish method is called after all Tests are executed.

Steps to create a TestNG Listener
For the above test scenario, we will implement Listener.

Step 1) Create class “ListenerTest” that implements ‘ITestListener’. Move the mouse over redline text, and Eclipse will suggest you 2 quick fixes as shown in below screen:

TestNG Listeners in Selenium WebDriver

Just click on “Add unimplemented methods”. Multiple unimplemented methods (without a body) is added to the code. Check below-

package Listener_Demo;

import org.testng.ITestContext ;
import org.testng.ITestListener ;
import org.testng.ITestResult ;

public class ListenerTest implements ITestListener
{

    @Override
    public void onFinish(ITestContext arg0) {
        // TODO Auto-generated method stub
       
    }

    @Override
    public void onStart(ITestContext arg0) {
        // TODO Auto-generated method stub
       
    }

    @Override
    public void onTestFailedButWithinSuccessPercentage(ITestResult arg0) {
        // TODO Auto-generated method stub
       
    }

    @Override
    public void onTestFailure(ITestResult arg0) {
        // TODO Auto-generated method stub
       
    }

    @Override
    public void onTestSkipped(ITestResult arg0) {
        // TODO Auto-generated method stub
       
    }

    @Override
    public void onTestStart(ITestResult arg0) {
        // TODO Auto-generated method stub
       
    }

    @Override
    public void onTestSuccess(ITestResult arg0) {
        // TODO Auto-generated method stub
       
    }
}
Let’s modify the ‘ListenerTest’ class. In particular, we will modify following methods-

onTestFailure, onTestSkipped, onTestStart, onTestSuccess, etc.
The modification is simple. We just print the name of the Test.

Logs are created in the console. It is easy for the user to understand which test is a pass, fail, and skip status.

After modification, the code looks like-

package Listener_Demo;

import org.testng.ITestContext;
import org.testng.ITestListener;
import org.testng.ITestResult;

public class ListenerTest implements ITestListener
{

    @Override
    public void onFinish(ITestContext Result)
    {
               
    }

    @Override
    public void onStart(ITestContext Result)
    {
           
    }

    @Override
    public void onTestFailedButWithinSuccessPercentage(ITestResult Result)
    {
   
    }

    // When Test case get failed, this method is called.
    @Override
    public void onTestFailure(ITestResult Result)
    {
    System.out.println("The name of the testcase failed is :"+Result.getName());
    }

    // When Test case get Skipped, this method is called.
    @Override
    public void onTestSkipped(ITestResult Result)
    {
    System.out.println("The name of the testcase Skipped is :"+Result.getName());
    }

    // When Test case get Started, this method is called.
    @Override
    public void onTestStart(ITestResult Result)
    {
    System.out.println(Result.getName()+" test case started");
    }

    // When Test case get passed, this method is called.
    @Override
    public void onTestSuccess(ITestResult Result)
    {
    System.out.println("The name of the testcase passed is :"+Result.getName());
    }

}
Step 2) Create another class “TestCases” for the login process automation. Selenium will execute this ‘TestCases’ to login automatically.

package Listener_Demo;

import org.openqa.selenium.By;
import org.openqa.selenium.WebDriver;
import org.openqa.selenium.firefox.FirefoxDriver;
import org.testng.Assert;
import org.testng.annotations.Listeners;
Import org.testng.annotations.Test;

public class TestCases 
{
WebDriver driver= new FirefoxDriver();

// Test to pass as to verify listeners .
@Test
public void Login()
{
    driver.get("http://demo.***.com/V4/");
    driver.findElement(By.name("uid")).sendKeys("mngr34926");
    driver.findElement(By.name("password")).sendKeys("amUpenu");                 driver.findElement(By.name("btnLogin")).click();
}

// Forcefully failed this test as to verify listener.
@Test
public void TestToFail()
{
    System.out.println("This method to test fail");
    Assert.assertTrue(false);
}
}
Step 3) Next, implement this listener in our regular project class i.e. “TestCases”. There are two different ways to connect to the class and interface.

The first way is to use Listeners annotation (@Listeners) as shown below:


@Listeners(Listener_Demo.ListenerTest.class)
We use this in the class “TestCases” as shown below.
So Finally the class ” TestCases ” looks like after using Listener annotation:

package Listener_Demo;
import org.openqa.selenium.By;
import org.openqa.selenium.WebDriver;
import org.openqa.selenium.firefox.FirefoxDriver;
import org.testng.Assert;
import org.testng.annotations.Listeners;
import org.testng.annotations.Test;             

@Listeners(Listener_Demo.ListenerTest.class)
public class TestCases 
{
WebDriver driver= new FirefoxDriver();

//Test to pass as to verify listeners.
@Test
public void Login()
{
    driver.get("http://demo.***.com/V4/");
    driver.findElement(By.name("uid")).sendKeys("mngr34926");
    driver.findElement(By.name("password")).sendKeys("amUpenu");
    driver.findElement(By.id("")).click();
}

//Forcefully failed this test as verify listener.
@Test
public void TestToFail()
{
    System.out.println("This method to test fail");
    Assert.assertTrue(false);
}
}
The project structure looks like:

TestNG Listeners in Selenium WebDriver

Step 4): Execute the “TestCases ” class. Methods in class “ListenerTest ” are called automatically according to the behavior of methods annotated as @Test.

Step 5): Verify the Output that logs displays at the console.

Output of the ‘TestCases’ will look like this:

TestNG Listeners in Selenium WebDriver

[TestNG] Running:
C:\Users\gauravn\AppData\Local\Temp\testng-eclipse--1058076918\testng-customsuite.xml

Login Test Case started
The name of the testcase passed is:Login
TestToFail test case started
This method to test fail
The name of the testcase failed is:TestToFail
PASSED: Login
FAILED: TestToFail
java.lang.AssertionError: expected [true] but found [false]

Use of Listener for multiple classes.

If project has multiple classes adding Listeners to each one of them could be cumbersome and error prone.

TestNG Listeners in Selenium WebDriver

In such cases, we can create a testng.xml and add listeners tag in XML.
TestNG Listeners in Selenium WebDriver
This listener is implemented throughout the test suite irrespective of the number of classes you have. 
When you run this XML file, listeners will work on all classes mentioned. You can also declare any number of listener class.

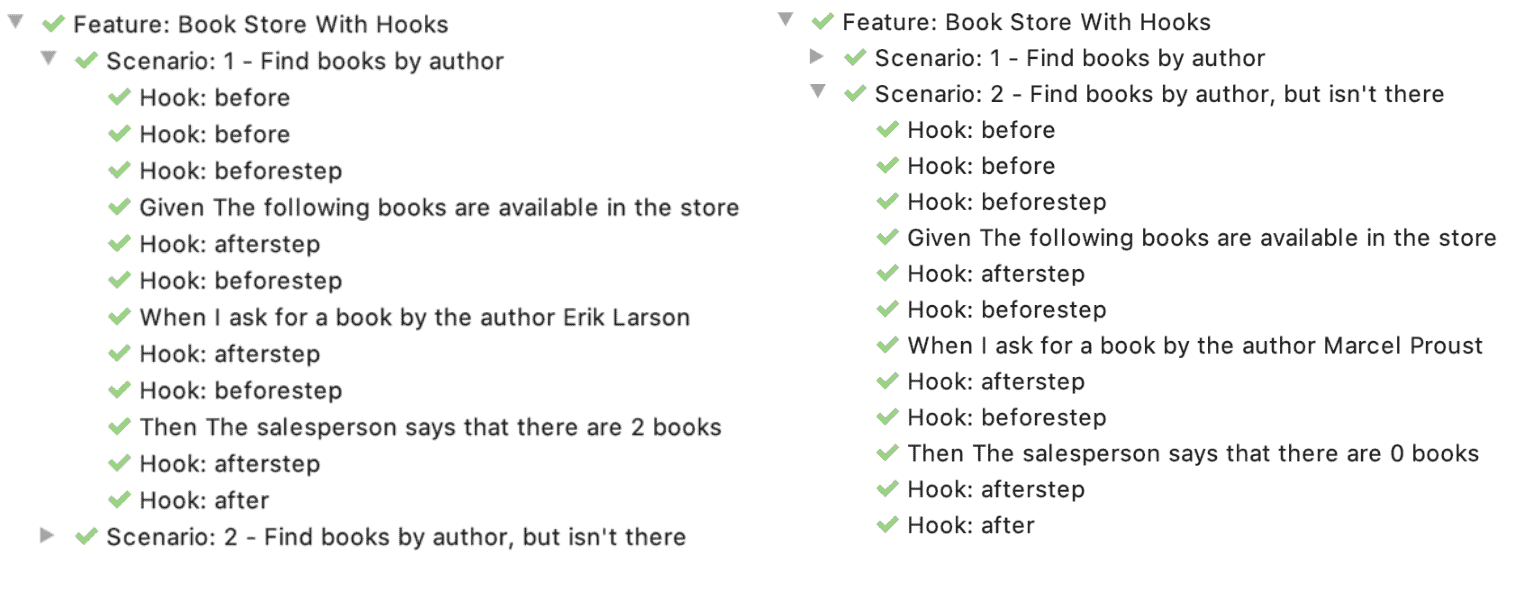
Q: What are different Hooks in cucumber ?

Ans:
3.1. @Before
Methods annotated with @Before will execute before every scenario. In our example, we'll start up the browser before every scenario:

@Before
public void initialization() {
    startBrowser();
}

If we annotate several methods with @Before, we can explicitly define the order in which the steps are executed:

@Before(order=2)
public void beforeScenario() {
    takeScreenshot();
}

The above method executes second, as we pass 2 as a value for the order parameter to the annotation. We can also pass 1 as a value for the order parameter of our initialization method:

@Before(order=1)
public void initialization()

So, when we execute a scenario, initialization() executes first, and beforeScenario() executes second.

3.2. @BeforeStep
Methods annotated with @BeforeStep execute before every step. Let's use the annotation to take a screenshot before every step:

@BeforeStep
public void beforeStep() {
    takeScreenshot();
}

3.3. @AfterStep
Methods annotated with @AfterStep execute after every step:

@AfterStep
public void afterStep() {
    takeScreenshot();
}

We've used @AfterStep here to take a screenshot after every step. This happens regardless of whether the step finishes successfully or fails.

3.4. @After
Methods annotated with @After execute after every scenario:

@After
public void afterScenario() {
    takeScreenshot();
    closeBrowser();
}

In our example, we'll take a final screenshot and close the browser. This happens regardless of whether the scenario finishes successfully.

3.5. The Scenario Parameter
The methods annotated with a hook annotation can accept a parameter of type Scenario:

@After
public void beforeScenario(Scenario scenario) { 
    // some code
}
The object of type Scenario contains information on the current scenario. Included are the scenario name, number of steps, names of steps, and status (pass or fail). This can be useful if we want to perform different actions for passed and failed tests.

Hooks Flow:
Screenshot-2019-12-29-at-15.28.42


Q: How to capture screenshot only for failed test in cucumber?

Ans:
This will give us the following code snippet:
@AfterStep
public void addScreenshot(Scenario scenario)
{
//validate if scenario has failed
if(scenario.isFailed()) 
{
final byte[] screenshot = ((TakesScreenshot)driver).getScreenshotAs(OutputType.BYTES);
scenario.attach(screenshot, "image/png", "image");
}
}
In the above statement, we used an "if statement" to check if the scenario is in a failed state or not. If the scenario is failed then only the screenshot code block will be executed.

Q: How can I run same test case multiple times?

Ans:
@Test(invocationCount = 10)
public void testCount() {..}

Q: How to integrate extent report in Cucumber with testNG ?

Ans:


1. Add Dependencies
Add the necessary dependencies for ExtentReports, Cucumber, TestNG, and Selenium to your pom.xml file:

   <!-- ExtentReports dependency -->
    <dependency>
        <groupId>com.aventstack</groupId>
        <artifactId>extentreports</artifactId>
        <version>5.0.9</version> <!-- Check for the latest version -->
    </dependency>
</dependencies>

2. Create an Extent Reports Utility Class
Create a utility class to manage the Extent Reports configuration and instances:

package com.yourpackage.util;

import com.aventstack.extentreports.ExtentReports;
import com.aventstack.extentreports.ExtentTest;
import com.aventstack.extentreports.reporter.ExtentHtmlReporter;
import com.aventstack.extentreports.reporter.ExtentSparkReporter;

public class ExtentManager {
    private static ExtentReports extentReports;
    private static ThreadLocal<ExtentTest> extentTest = new ThreadLocal<>();

    public static ExtentReports getExtentReports() {
        if (extentReports == null) {
            ExtentSparkReporter sparkReporter = new ExtentSparkReporter("ExtentReport.html");
            sparkReporter.config().setReportName("Automation Test Results");
            extentReports = new ExtentReports();
            extentReports.attachReporter(sparkReporter);
            extentReports.setSystemInfo("OS", "Windows");
            extentReports.setSystemInfo("Tester", "Your Name");
        }
        return extentReports;
    }

    public static ExtentTest getTest() {
        return extentTest.get();
    }

    public static void setTest(ExtentTest test) {
        extentTest.set(test);
    }
}

3. Create Cucumber Hooks for Extent Reports
Create hooks to manage the lifecycle of Extent Reports for each scenario. Add these hooks in a class annotated with @io.cucumber.java.Before and @io.cucumber.java.After.

package com.yourpackage.hooks;

import com.aventstack.extentreports.Status;
import com.yourpackage.util.ExtentManager;
import io.cucumber.java.After;
import io.cucumber.java.Before;
import io.cucumber.java.Scenario;

public class Hooks {

    @Before
    public void setUp(Scenario scenario) {
        ExtentManager.getExtentReports();
        ExtentManager.setTest(ExtentManager.getExtentReports().createTest(scenario.getName()));
    }

    @After
    public void tearDown(Scenario scenario) {
        ExtentManager.getTest().log(Status.INFO, "Scenario status: " + scenario.getStatus());
        if (scenario.isFailed()) {
            ExtentManager.getTest().fail(scenario.getThrowable());
        }
        ExtentManager.getExtentReports().flush();
    }
}

4. Configure Your Cucumber Runner
Ensure your Cucumber runner is set up to use TestNG:

package com.yourpackage.runners;

import io.cucumber.testng.AbstractTestNGCucumberTests;
import io.cucumber.testng.CucumberOptions;

@CucumberOptions(
    features = "src/test/resources/features",
    glue = "com.yourpackage.stepdefinitions"
)
public class TestRunner extends AbstractTestNGCucumberTests {
    // Cucumber Runner class
}

5. Run Your Tests
Run your tests using your preferred method (e.g., through Maven or your IDE). The Extent Report will be generated in the specified location 

Note:
  • ExtentTest: Represents a single test or a set of test steps in the report.
  • ExtentHtmlReporter and ExtentSparkReporter: Reporters used to create and configure the report format and output location.
  • Comments